During RFQ creation, an option to create a pricing schedule is available when your organisation has set your chosen category or service (e.g. Electrical Services) to be eligible for a pricing schedule.
TABLE OF CONTENTS
Introduction to the features of pricing schedules
Please be aware of the following features of pricing schedules to help you better prepare your schedule and know what to expect once responses start coming in from vendors:
- Versions (revisions) can de drafted and issued later if you need to make changes throughout the RFQ period.
- There are column settings available to show or request more information from vendors - e.g. show a reference number like a part number or specification, or request the manufacturer details for an item from the vendor.
- Pricing schedules are organised into sections and rows. Sections are intended to organise content and provide subtotals, where Rows are either detailed line items that vendors will respond to, or Note Rows to communicate information in the schedule.
- Felix auto-numbers the sections and rows for reference by all parties.
- You can add, insert, duplicate (rows) or delete sections or rows which provides you flexibility in editing the pricing schedule.
- You can include Note Rows to communicate information directly in the schedule.
- There is a custom identifier field to align line items with your project or company's cost codes or work breakdown codes. This data is available for API customers who might like to further analyse category pricing across RFQs and Projects.
- You can make a line item "Response Optional" in cases where you want to solicit interest or capacity for additional or optional scope from vendors.
- Vendors will be able to respond with "Quoted", "Included" or "Excluded" to each line item, and can include comments, exclusions, and inclusions per row.
- You can later normalise responses from vendors using the Quote Analysis tab, adding financial and non-financial attributes or values per bidder. See How to Review, Analyse, and Normalise the Pricing Schedule.
It is recommended to first configure the pricing schedule using the Settings button as this will impact the import CSV template and/or available columns in your view in Felix.
Modifying settings:
- Click on the Settings button at the top right corner of the table.
- Select from the following options:
- Allow Bidders to modify suggested quantities - Selecting this allows vendors to suggest the quantity of items they are quoting on.
- Allow custom columns to the schedule- Selecting this allows you to add custom columns to the pricing schedule in which vendors can see or respond. The columns available are as follows:
- Lead Time (vendor can respond) - Use this option if you require the vendors to provide a lead time per item (in days).
- Manufacturer (vendor can respond) - Use this option if you require the vendors to provide details on the manufacturer of quoted items.
- Reference Number (vendor can see) - Use this option to provide an additional column of information to vendors. You can enter any specifications or details on what you are expecting for an item.
You can change these settings later on in the RFQ, by creating a new version of a schedule for issue to vendors. See Editing and issuing a revision to a Pricing Schedule.
You can enter data directly, or import it from Excel
There are two ways to create a pricing schedule. Both can be used together as needed:
- Create and edit pricing schedule rows directly in Felix
- Import a CSV to populate the pricing schedule (You can then edit directly in Felix.)
Create and edit pricing schedule rows directly in Felix
Reminder: the option to create a pricing schedule is only available when your organisation has set your chosen category or service (e.g. Electrical Services) to be eligible for a pricing schedule.
To create and edit pricing schedule rows directly in Felix:
- After selecting a type or category under Add Packages tab during RFQ creation, click the Create Pricing Schedule button in Pricing Requirements section.
- To create and edit sections:
- Update the Section name by clicking the section title.
- To add a section below the last section, click the Add New Section button at the bottom of the table.
- To add a section above or below a current section, highlight the current section and click Insert Section Above or Insert Section Below buttons atop the table.
- To delete a section and all its content/rows, click the Delete Section button atop the table.
Note: A section cannot be dragged up or down the table to change order, however, rows (content of sections) can be moved and their item numbers will be updated automatically.
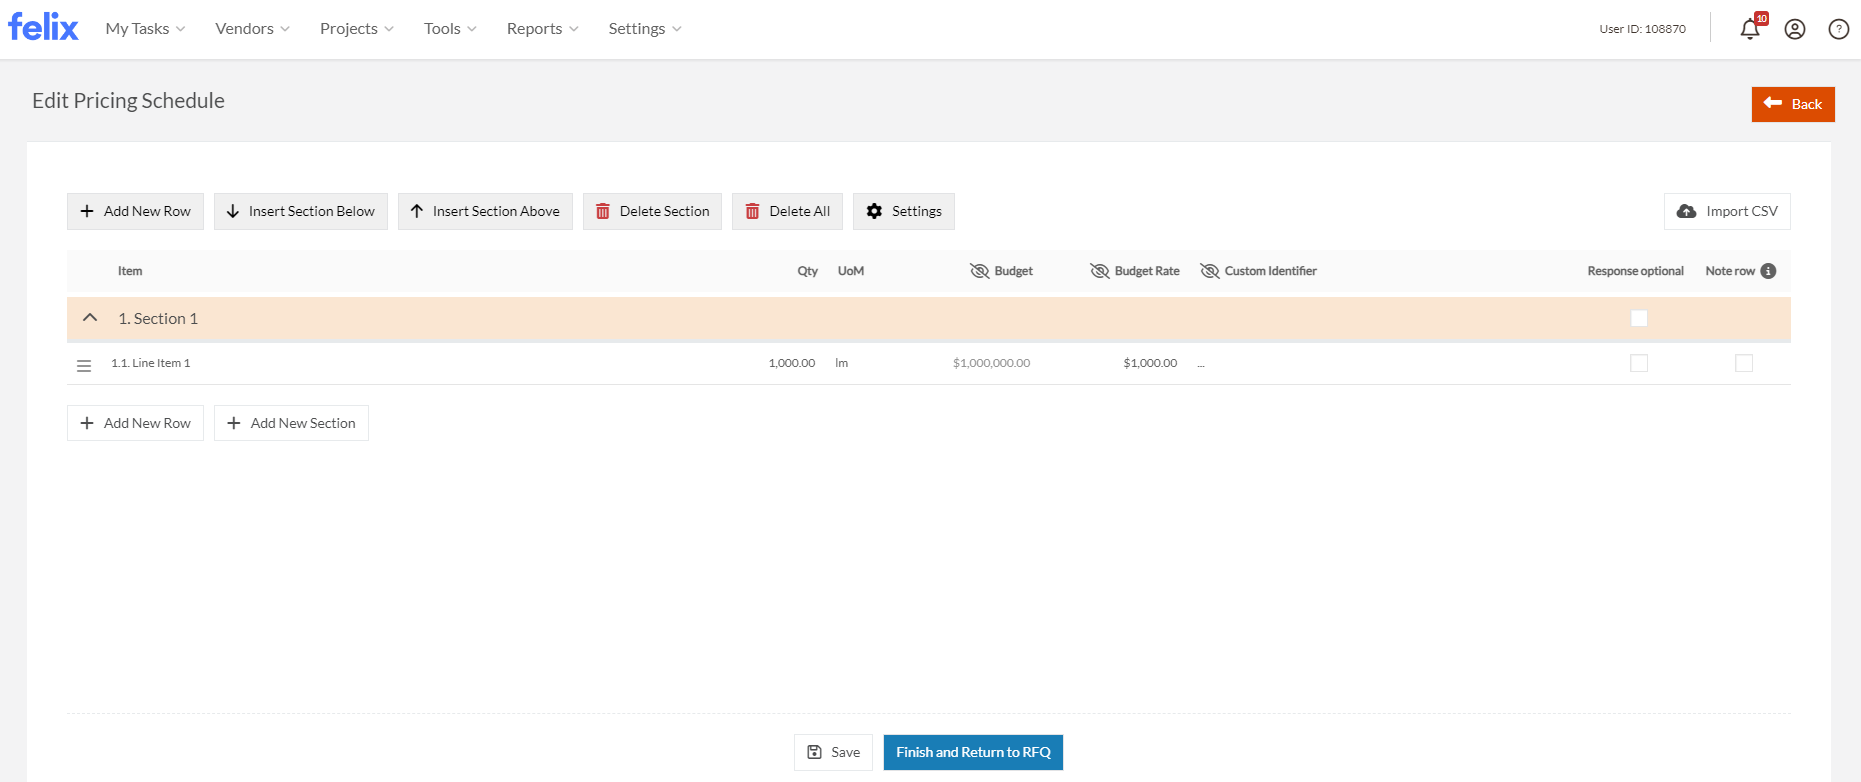
- To create and edit rows:
- Update a row description by clicking the existing title text.
- You can move across the row and enter details as required.
- (If configured in Settings; Optional) Reference No - Add or edit any additional reference numbers or specification references to help the vendor.
- Qty - Add or edit the quantity you require from the vendor.
- UoM - Add or edit the unit of measure for the line item.
- (If configured in Settings; Optional)Lead Time (days) and Manufacturer - These are displayed only so you are aware that the vendor will see these fields in their response view.
- Budget (This field is not shown to vendors.) - Enter the total budget allocated for the line item. You can leave this field blank if the Budget Rate field has been updated and it will automatically calculate.
- Budget Rate (This field is not shown to vendors.) - Enter the budget for a single unit of the line item. You can leave this field blank if the Budget field has been updated.
- (Optional) Custom Identifier (This field is not shown to vendors.) - Enter an internal identifier such as service master, code of accounts or cost breakdown code used by your organisation.
- Response Optional - Click this checkbox if vendors are not required to (but can optionally) quote on the line item.
- Note Row - This checkbox indicates whether a row is only for the purpose of communicating information - and that vendors don't need to respond to it. Notes Rows can only accept a description - and that description can be up to 200 characters (around 2-4 sentences).

- To add more rows, here are a few options:
- To add a new line item at the bottom of the table, click the Add New Row button at the bottom of the table.
- To duplicate a current row, highlight the current row and click the Duplicate Row button atop the table.
- To add a row above or below a current row, highlight the current row and click Insert Row Above or Insert Row Below buttons atop the table.

- To delete a row, highlight the row and click the Delete Row button atop the table.
- To save the updates you made, click the Save button if you wish to complete it at a later time or click the Finish and Return to RFQ button upon completing it.
- Each custom section automatically calculate subtotals which provides an overview of pricing for each section and that it makes analysing of budgets easily as you scroll through a long schedule.
The ? icon to the left of any Item name will allow you to re-order each line item - by clicking, holding and dragging it to the desired position.
Use a quantity of "0" for a row if you are simply seeking rates for an item and are not providing or seeking a fixed quantity. This will keep the subtotal as $0 for items with unknown quantities/rates on submissions.
For Response Optional columns, use the checkboxes in a section to check all or deselect all rows in that section.
Import a CSV to populate the pricing schedule
If you already have sections and rows in your pricing schedule in Felix, imported rows will be appended to the bottom of the existing content.
To import pricing schedule content:
- Click the Import CSV button at the top right corner.
- An Import from CSV box will pop up which includes notes about the import function. Click the Download a Template CSV here link to download the template which will be used to import.
Note: The provided CSV template will reflect the current column settings. If you change column settings, check you have the right template.
- Once downloaded, open the pricing schedule CSV template.
- Populate the following columns to create sections:
- Section? - Enter "Y" or "Yes" or "1" to signify this is a section header for import.
- Item - Enter the title here for the section description.
- No other columns required.
- Populate the following columns to create rows:
- Section? - Leave this field blank or enter "N" or "No" or "0".
- Item - This field is for the description of the line item. In the case of a Note Row, this is where you enter the note text.
- (If configured in Settings; Optional) Reference No - Add any reference numbers or specification references to share with and help the vendor.
- Qty - Add the quantity required from the vendor.
- UoM - Add the unit of measure for the line item.
- Budget (This field is not shown to vendors) - Enter the total budget allocated for the line item. You can leave this blank if the Budget Rate has been populated.
- Budget Rate (This field is not shown to vendors) - Enter the budget for a single unit of the line item. You can leave this blank if the Budget has been populated.
- (Optional) Custom Identifier (This field is not shown to vendors) - Enter an internal identifier such as service master, code of accounts or cost breakdown used by your organisation.
- Response Optional? - this indicates whether the line item requires a response from vendors, or a vendor can respond optionally. Enter "Y" or "Yes" or "1" if Yes or "N" or "No" or "0" if No.
- Note Row? - this indicates whether the line item is a note only for informational purposes. Vendors will not be able to respond to these rows. Enter "Y" or "Yes" or "1" if Yes or "N" or "No" or "0" if No.
- Save changes to the pricing schedule template CSV file on your computer.
- To upload, click the Choose File button and select the template you have saved.
- Upon selecting the template, click the Open button. A Preview of the added line items or sections will be shown at the bottom of the Import from CSV box.
Note: for Notes Rows - If you included any columns other than the Item (description), these will be cleared on import for rows you have flagged as a Note Row in the "Note Row?" column
- If everything looks good, click the Add button. (Note: you can made changes once you have imported)
- Click the Finish and Return to RFQ button once done.