The issuing organisation for an RFQ may request that you submit your quote's pricing in a custom pricing schedule.
This is a a pricing schedule format in Felix that allows them to compare proposals more easily. These are sometimes also referred to in industry as a bid tab, bid sheet, pricing breakdown, or bill of quantities.
TABLE OF CONTENTS
Key concepts first - versions and submissions
Pricing Schedules (the term in Felix) are sometimes also referred to in industry as a bid tab, bid sheet, pricing breakdown, or bill of quantities.
- Think of a pricing schedule as a template document that is issued by a client on an RFQ, just like any other document.
- Documents on projects often have "versions", where they are revised by clients to add, edit or remove content. In Felix, we have versions of pricing schedules, where your clients can revise the pricing schedule template and re-issue to you, just like any other document.
- In order to track key submissions of these pricing schedule templates, Felix labels submissions that you make as "submissions". They start with Submission 1 which is the end result of your quote during the Open RFQ period. This Submission 1 is inclusive of any edits you've made along the way as the client may have issued Addendums or "Allowed quote updates" throughout the open period.
- In the Closed RFQ period, with each post tender request that a client makes to you, we label these submissions by you as Submission 2, Submission 3, Submission 4 etc
Opening and filling out a pricing schedule submission
To complete a pricing schedule for an RFQ:
- Go to the Response tab of the RFQ you wish to respond to
- Under Pricing section or your chosen service/package (RFQs can sometimes have multiple items requested on them), click the Open Pricing Schedule button.
- You will only be able to edit the latest Submission #of a pricing schedule where a client has issued more than one version via addendum or post tender request. Felix will default select the latest version & submission # for you.
- Submission selector - use this to access previous Submissions - to view your submission (if submitted) or draft entries you prepared, and to export prior versions.
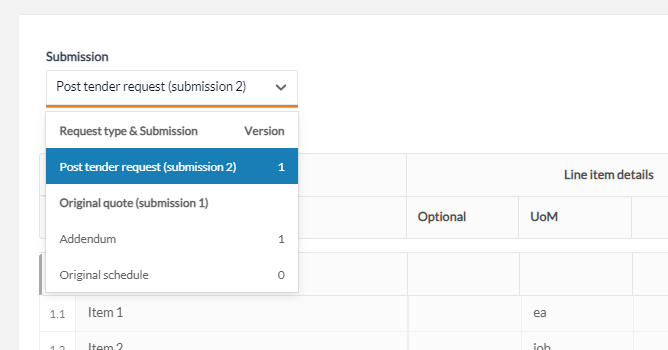
NOTE: By selecting previous submissions, you can export them for any additional record keeping or to use as a a basis of data for importing to the latest submission.
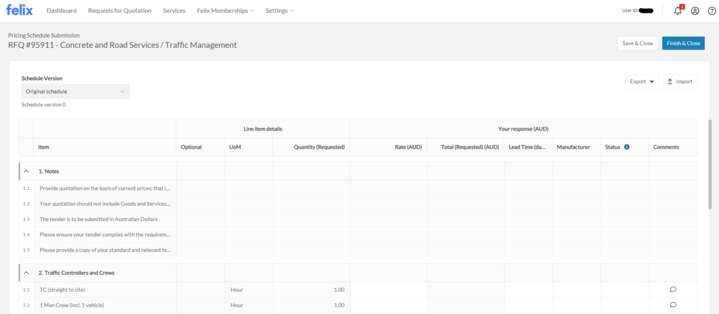
- Observe the following features of the pricing schedule:
- Optional column - If a client has labelled a row Optional, you are not required to respond to that row but you may if you to quote on those items.
- Notes rows - you will see some rows greyed out where no response fields are editable. These are just informational rows for you. No response required.
- (If your client has configured this) Quantity (Proposed) - This column allows you to suggest quantities different to what the client has estimated.
- Currency - Either the default RFQ currency will be shown across the table or the currency you chose in the RFQ Response tab (only where you are provided an option by the client).

- For each row/item in the pricing schedule, you can set the status to Quoted, Included or Excluded.
- If you enter a rate into the Rate column, the Status column will automatically flag the item as Quoted. (You may also be required to provide a Lead Time and Manufacturer if the client has requested this.)
- If you want to indicate that a row is included elsewhere on the pricing schedule, select Included in the Status column. This will clear any rate you may have entered. We highly recommend to use the Comments feature to provide more context on where it is included.
- If you want to indicate that a row is excluded from your quote altogether, select Excluded in the Status column. This will clear any rate you may have entered. We highly recommend to use the Comments feature to provide more context on the reason for your inability to provide the item.
- Update the Rate column for each line item on the pricing schedule by clicking into each cell twice.
- (Optional, but highly recommended) You can leave comments under the Comments column by clicking the bubble icon on each line item.
- Comments - Enter any relevant context required. Highly recommended to add a comment here for Included and Excluded line items.
- Inclusions - Typically used for Quoted items to refine or clarify the scope of what you have quoted.
- Exclusions - Typically used for Quoted items to refine or clarify the scope of what you have quoted.
If you later decide to quote an item that you flagged as Included or Excluded, you can change the status to Quoted in the Status column. This will require you to enter a Rate (and possibly a Lead Time and Manufacturer if the client has requested this.)
Saving and completing a pricing schedule submission
Felix auto-saves your entries to the schedule as you fill it out, however we also offer a Save button for those that prefer the comfort and familiarity of a Save button.
If you wish to return later and complete the schedule after collecting some information offline or working with your team, you can use the Save & Close button to do this. We wont bug you with validating any missing information just yet in this case.
If you believe you have completed everything needed, and wish to validate and finish your submission, at any time, click Finish & Close at the top right corner of the pricing schedule to have Felix validate your submission, save your work and return to the RFQ screen.

- If you Finish & Close without completing the full pricing schedule, you will be prompted to either set all blank items as Included or Excluded.

IMPORTANT: Until you click "Submit" on the Response tab of the RFQ page, you can always return here to make changes.
Exporting your pricing schedule to Excel
Your responses will be saved in Felix and you are able to access your archived RFQs in the RFQ list. However, you also have the option to export your pricing schedule as a downloaded file.
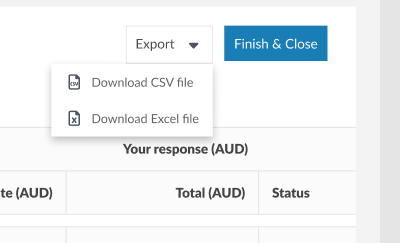
- Use the Export button (top right corner of the pricing schedule submission page) - at any time, to export the pricing schedule view into a CSV or Excel format. Some vendors use this to prepare responses offline before coming back to enter values into Felix.
While the CSV export will provide you with raw data from the pricing schedule, vendors now also have the option to export to Excel format allows for a more digestible and appealing format of the pricing schedule information, as well as providing users with more instructions and guidance on how to best update a pricing schedule.
- Simply Select "Excel file" from the Export drop down button.
- You will see the downloaded file contains enhanced formatting, calculations for line-items, and controlled input fields.

Importing data from a spreadsheet
As an alternative to entering your responses directly into a pricing schedule in Felix, you are able to import data from a spreadsheet format. To do this, you will need to use a template provided by Felix. Felix provides both a CSV (Comma Separated Values) template as well as a XLSX (MS Excel) template for your use. These templates are specific to the RFQ and schedule version you are responding to.
To import data from a spreadsheet:
- Click on the Import button on the screen. A modal will open with instructions.

- If you haven't already obtained a template, use the provided links to download either an Excel (.XLSX) or CSV template from Felix. We recommend the Excel template as it includes further validation and guidance to assist in completing the response offline.
The import tool will only accept the correct version of a pricing schedule - it checks for an expected set of rows that are unique to what you see on the screen you are trying to import to.
- Complete the spreadsheet offline using your favourite spreadsheet program. Make sure you save it as a CSV, XLS or XLSX file format.
- Return to the RFQ pricing schedule screen and click Import again.
- Drag and drop your completed spreadsheet in the modal as instructed.
- Felix will scan your file for any errors or warnings. Felix may stop you if the file you have uploaded is not for the RFQ in question.

Otherwise, Felix will provide warnings if there are modifications or additional inputs that you will need to make in platform following the import.
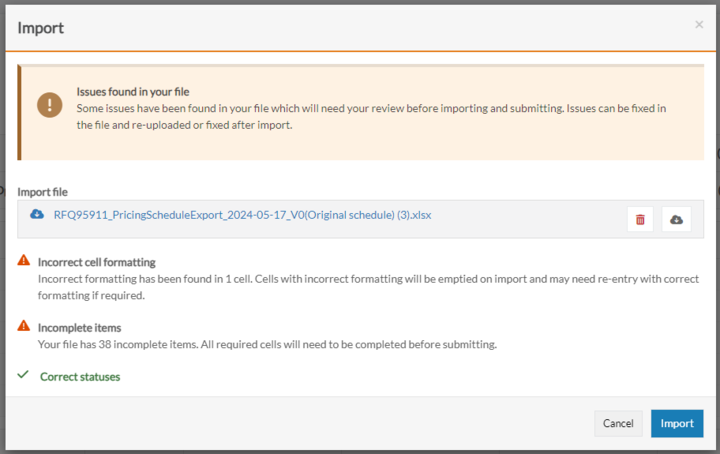
- Click on Import to confirm. Felix will then fill out the pricing schedule using your spreadsheet data, and will highlight any rows that require your attention in order to submit the schedule.
Notes
Issuing organisations of RFQs have some options when they create custom pricing schedules.
Depending on their setup per RFQ item, you may see more columns of information in the schedule they have issued you:
- Reference Number - additional detail from the client for a line item, to describe the requested item; and/or
- Lead Time (days) and Manufacturer - where they are requesting you to provide more detail for each line item; and/or
- Suggested Quantity - where they are offering you the ability to propose alternate quantities to their BOQ, as you see them from the documentation and scope provided in the RFQ.
When your clients develop their pricing schedule in Felix, they can also configure each row (line item) of a schedule as follows:
- Notes Row - these rows are used only to communicate information to you and do not require a response from you.
- Optional - these line items have been deemed as optional items that you may choose to quote for the client, but you are not required to provide a quote in order to respond to the RFQ successfully.
On multi-currency RFQs, you can select your response currency on the Response tab
If you client has offered multiple response currencies, you will see a selection available in the Pricing section of the response tab.
You can only respond in a single currency. Reach out to your client if you have a blend of currencies across your quoted items.
Clients can issue revisions to a pricing schedule, we call them versions
Think of the pricing schedule as another document" provided on the RFQ.
Similar to issuing revisions of documents via addendum, clients can issue new versions of pricing schedules. When they do so, the latest version becomes the only version that you can edit and submit to them. Previous version entries you have made are saved, and you can export them, but you cant edit them.