- Organisations like yours typically have many forms of sourcing events issued to the market. To reflect the variety of events such as RFQ, RFP, and EOI, we have adopted the term "RFx". This new feature in the Alpha release testing phase also brings the ability to start configuring multiple templates for quick access to the most common events for your organisation.
- This feature is in a pre-release testing phase (Alpha release) and can only be enabled by your organisation's Customer Success Manager at Felix. Event features (such as RFQs) are currently limited to the simplest needs for quick requests to market and to test user experience and RFx template configurations. Use the "legacy" RFQ process (guidance below) if you require additional features. Refer to Other Notes at the bottom of this article for RFx event limitations in this Alpha release.
Pre-requisites and RFx Templates
The following guide relates to organisations where the RFx feature has been enabled for testing. For all other users, refer to How to create an RFQ.
We have preloaded a global Quick Request RFx template for use by all organisations. This demonstrates the likely expected layout and use of the RFx feature for the initial, simplest and fastest events to market.
Your organisation can work with your Customer Success Manager at Felix to experiment with the current template configuration that is available such as field labels, help text, and mandatory/optional or hidden fields.
Creating a new RFQ
During the pre-release phases of RFx testing, you will have access to both the legacy RFQ process and the new RFx process.
To create a new RFQ:
- Navigate to Projects > Requests for Quotation from the main menu.
- Click the Create New RFQ button in the top right corner.
- You will be directed to a new page where you can select a project, a folder, and a template to create your request.
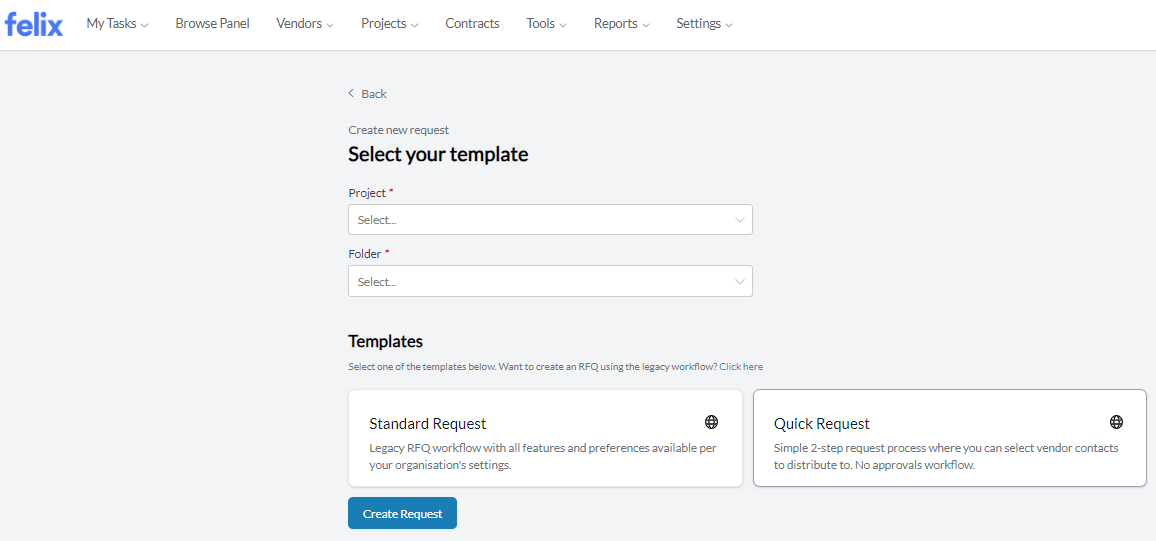
- Select a Project and a Folder from the dropdowns.
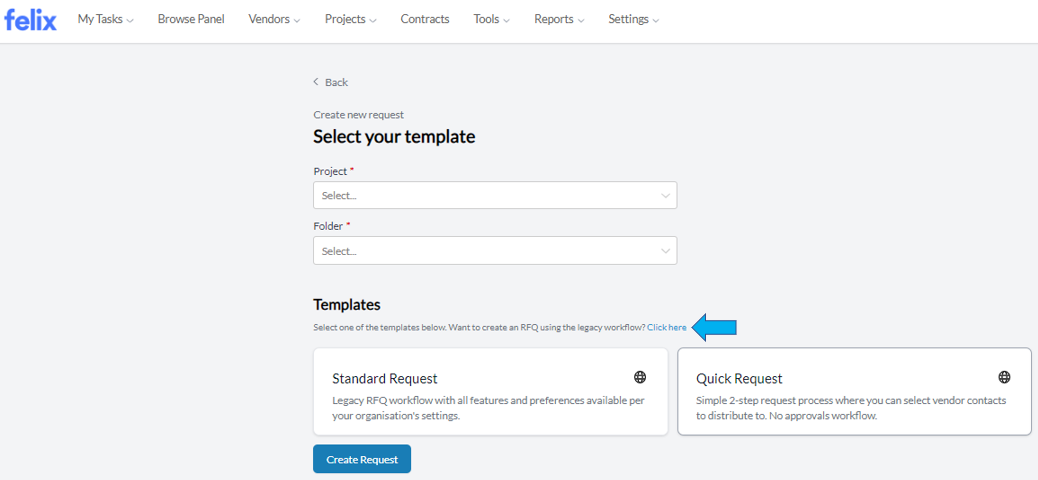
- If you prefer to stick to the legacy RFQ process, you can either use the text link or select the Standard Request tile.
- Select your preferred template under the Templates section by clicking the template tile.
- Felix global templates will feature a globe icon in the tile. Other templates that do not have the globe icon are your organisation's custom-configured templates. In both cases, refer to the subtitle of each tile for its intended use.
- Refer to this article for details on setting up templates and the current configuration options available in RFx templates
- Once you have selected your project, folder, and template, click the Create Request button.
- You will be directed to STEP 1 of the RFx event creation. Shown below is the Felix global Quick Request RFx template.

- On the left under the REQUEST DETAILS section, you can:
- Click the Request Owner dropdown to update the owner if needed.
- (Optional) Click the Request Watchers dropdown to select one or more Request Watchers. (Watchers receive email updates about the event but are not granted additional permissions.)
- In the About your request section, update the following fields:
- Add a title for your request - Enter a title for the RFx event/request. This is visible to vendors and is searchable on your RFQ listing.
- Request Type - Select the type of request from the dropdown. This is visible to vendors so they can gauge your expectations and their interest. (Felix has preconfigured the most common options. Feedback is welcome on additional options needed.)
- Choose a category of work - Select a category by clicking the dropdown. This listing is configured per your organisation's needs and is the same as the legacy RFQ process. (A link to Procurement Schedule packages is not part of the Alpha release for testing.)
- Submissions due date - Enter the close date for the RFx event.
- Submissions due by - Enter the close time for the RFx event.
- In the Describe the scope of work section, use the following fields to communicate your expectations for the work being requested in the sourcing event. Attachments can be added in the next section.
- Add further detail about your request - This is visible to vendors when they view the event on their Felix platform. You can format text styling and use lists plus more to organise your message.
- (Optional) Location site/details - Enter the relevant location details for the vendor to know where the delivery address or service location is.
- (Optional) Work commencement date - Select the date when you require the work to start or goods to be delivered. This is visible to vendors.
- (Optional) Estimated work completion - Select the date when you expect the work to be completed. This assists the vendor's understanding of job duration before they assess any attachments you may have also provided.
- In the Attachments section, you can upload or drag and drop any relevant technical, commercial or legal documents that the vendor needs to respond to you. The document groupings you see here will depend upon the RFx template you have chosen and its configuration.
- You can attach your documents to the existing document groups for the template or add a new document group of your own by entering a new document group title into the field next to the plus icon.
- You can delete document groups using the trash bin icon.
- Click the Upload a file link to select and upload the relevant documents or drag and drop the documents.
- Maximum file size is 300 MB. Accepted file types are listed here. You can select multiple files at a time to upload.
- Each document group will display the document count, allowing you to conveniently track the number of uploaded documents within each group to ensure what you expected to upload is there.
- For users who are using Document Management System ("DMS") integrations like InEight or Aconex, you can import documents into an RFx using the buttons provided (see image). These buttons will be visible for an RFx inside a project with enabled DMS integrations.

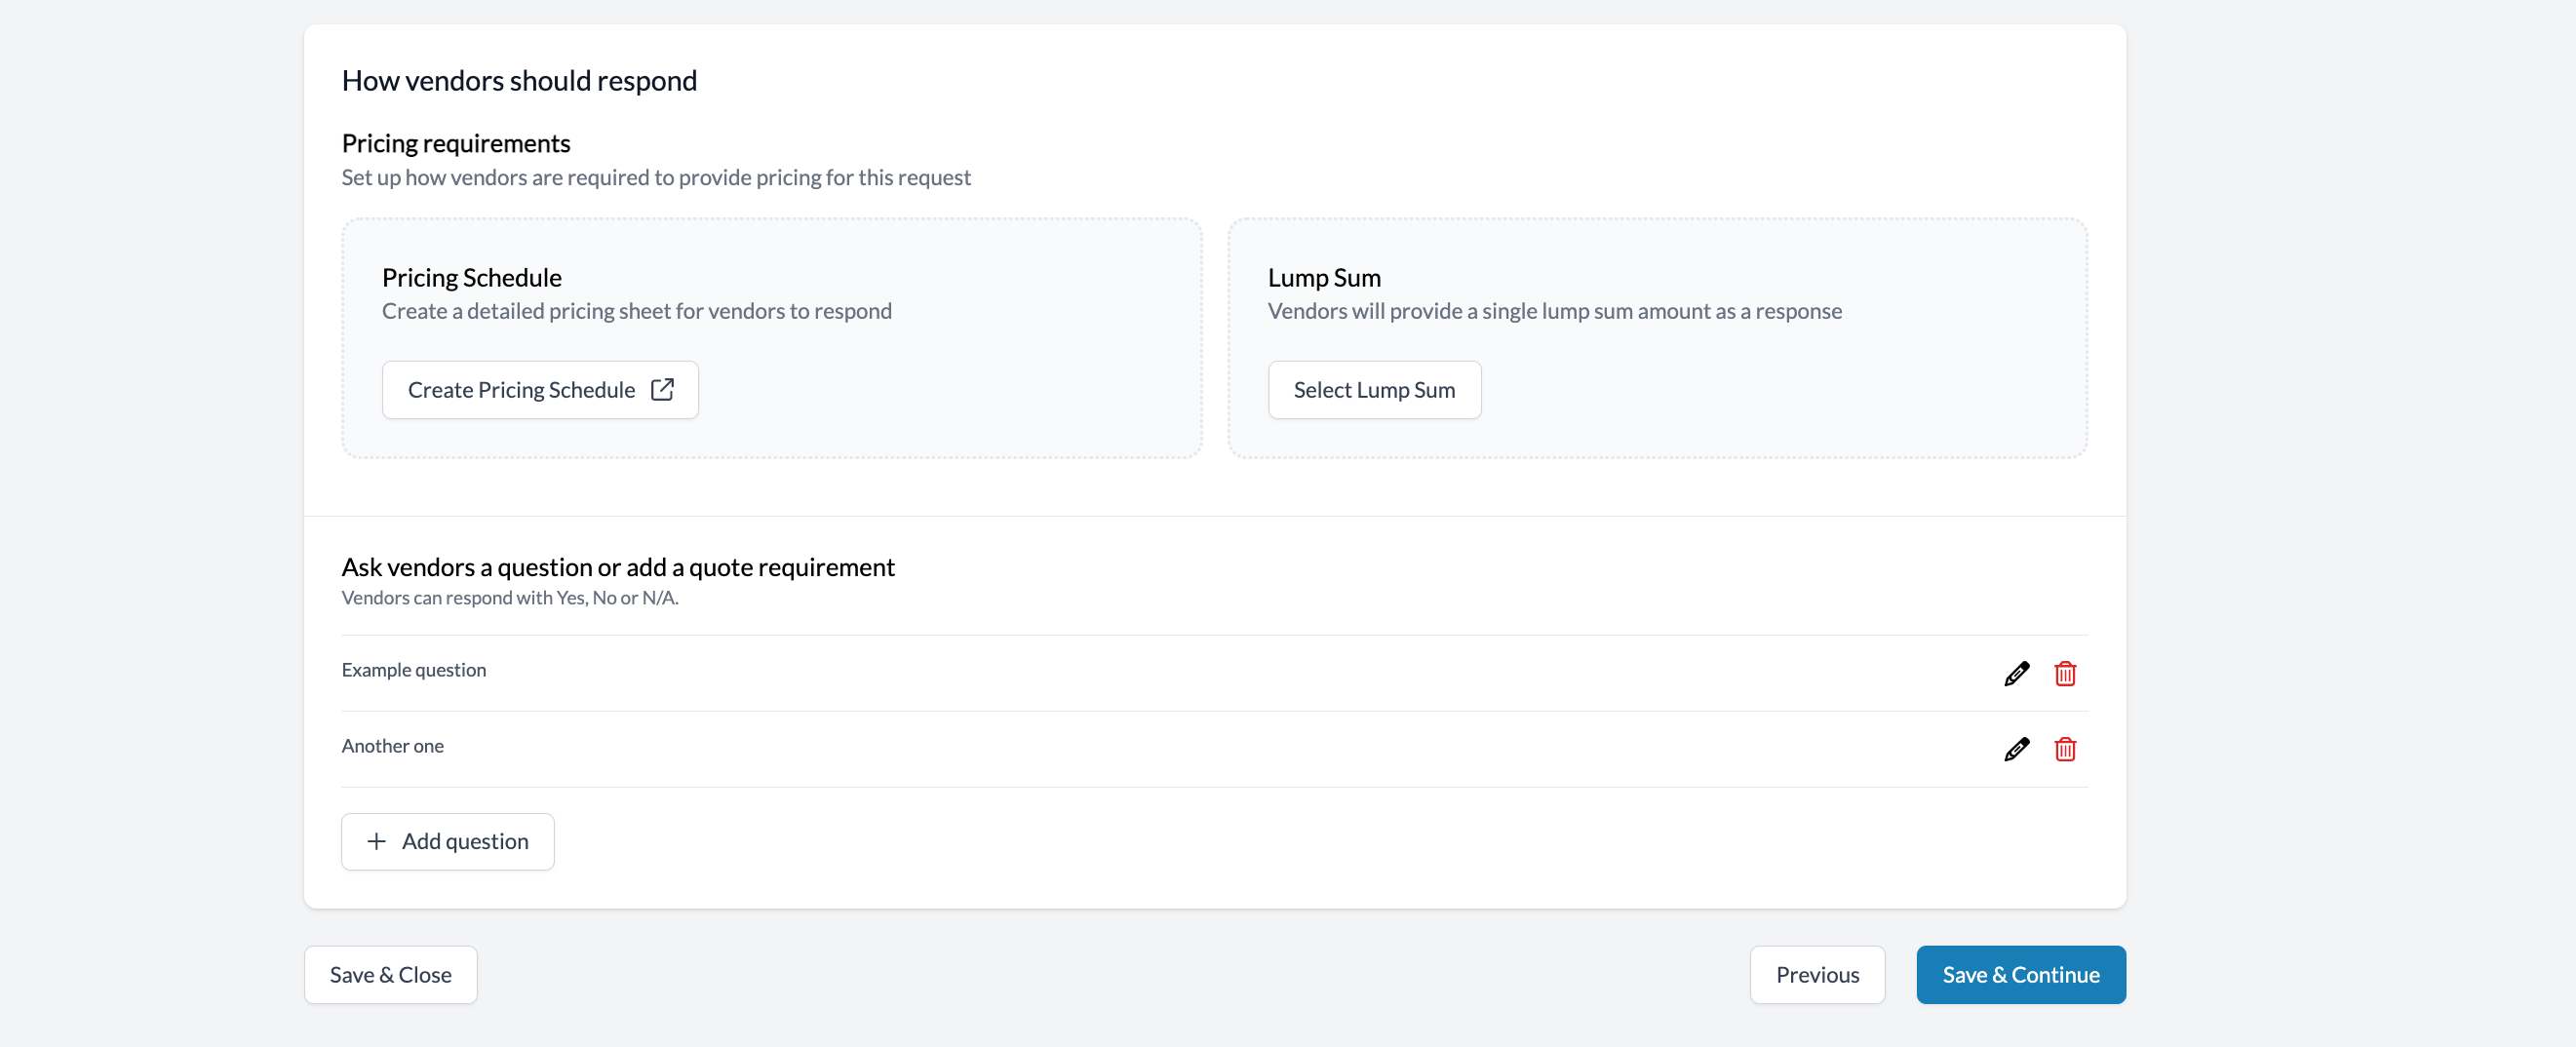
- In the How vendors should respond section for Pricing requirements, select from the following options as to how vendors are required to provide pricing for the event.
- Pricing Schedule - You will be directed to create a detailed pricing sheet (bill of quantities) for vendors to respond with. To create pricing schedules, refer to How to Create a Custom Pricing Schedule.
- Lump Sum - Vendors will be requested to provide a single lump sum amount as a response.
- In the Ask vendors a question or add a quote requirement section, you can query vendors for any standardised responses needed by clicking the Add question button. Vendors can respond with Yes, No or N/A. You can edit or delete your question or quote requirement by using the pencil icon and trash bin icon.
- Click Save & Continue. You have now completed your request details and will be directed to STEP 2 of the RFx creation process to select recipients for the event. Step 2 is shown below.

- In the Search Vendors section, enter or start typing an email address, company name or contact name of a vendor to search. It will return matching results in these three fields.

- We understand that most of our users like you have relationships with vendors. However, if you are unsure of who to send it to, note the Key Contact badge on the right side of each row. Add the key contact person if you are unsure.
- Click the Add button beside each relevant vendor contact to select them and include them as a recipient.
- The added vendor is shown in the Selected Vendors section. You can additionally select or deselect contacts to send the request to in this section by clicking the Add button beside the relevant contact.
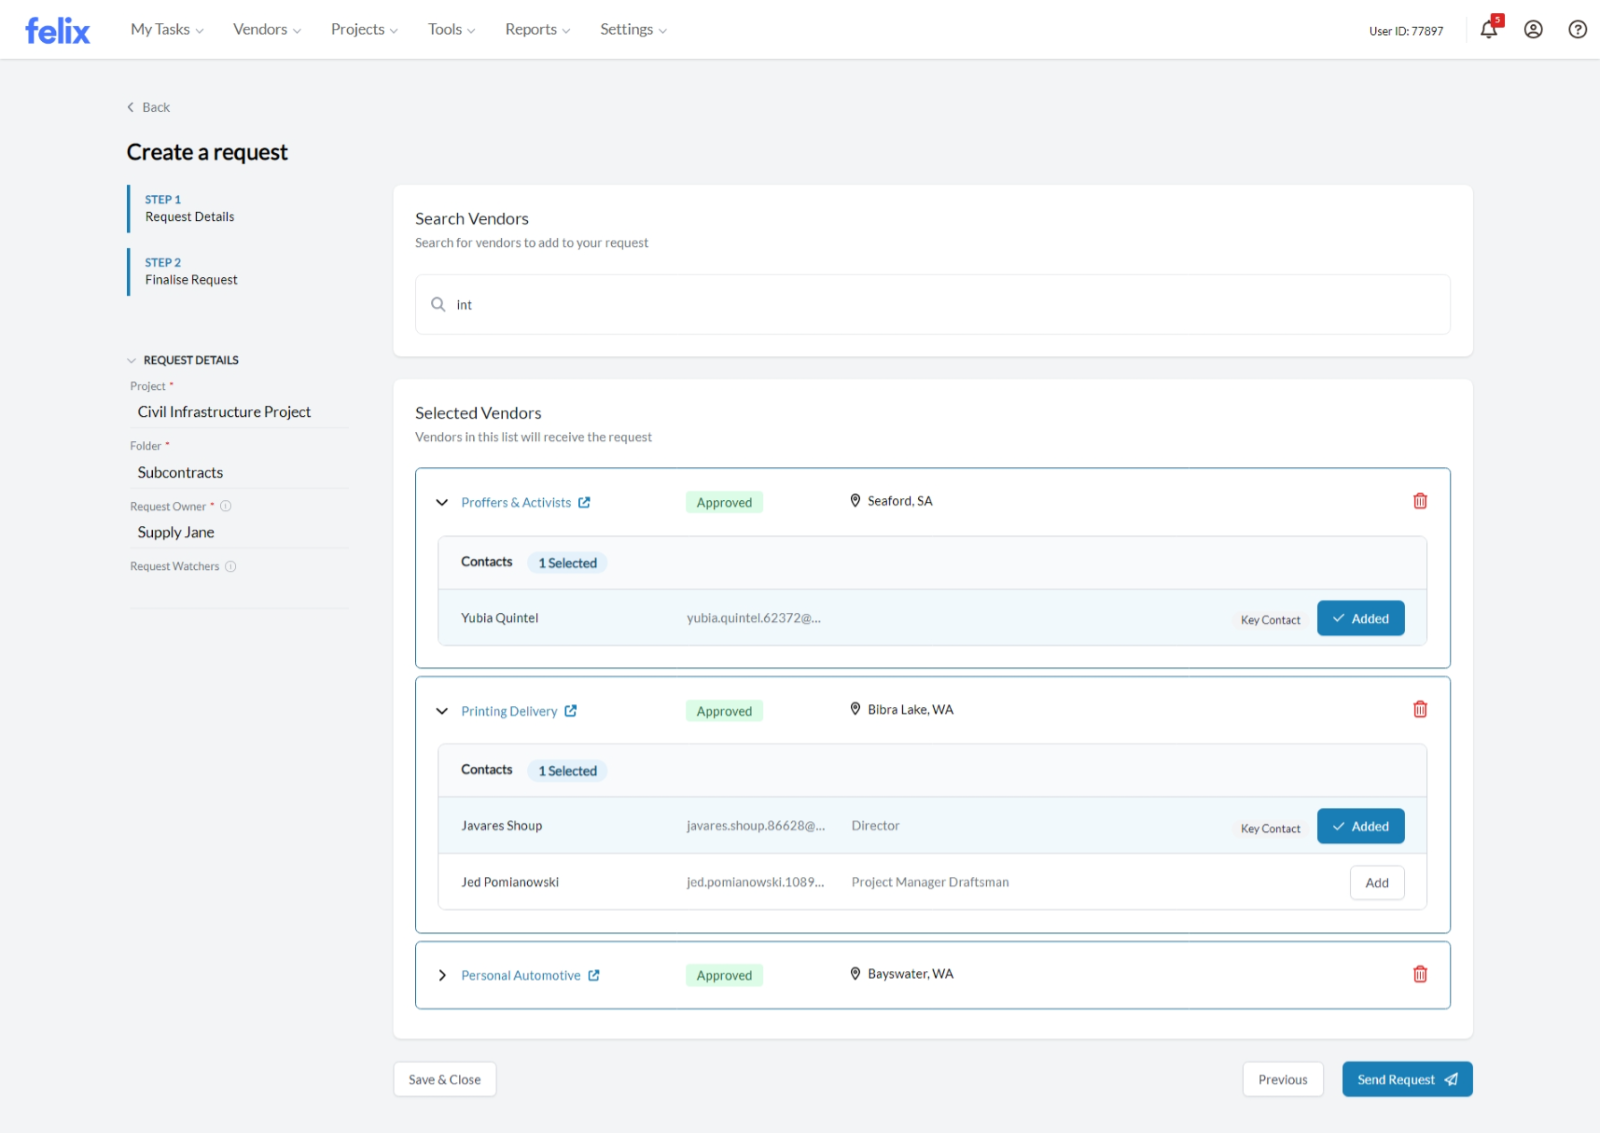
- To finish and send the request, click the Send Request button.
- You will be directed to the RFQ view page to see the event you created. Emails and notifications to vendors will be triggered.
- If you wish, you can optionally Save & Close to come back and finish the request at a later time.
Duplicating RFQs
You can duplicate RFQs from the RFQ listing (Projects > Requests for Quotation). If you duplicate a saved RFQ (e.g. not Open) that was created using the RFx process, it will also open the duplicate in the RFx process.
Currently, the RFx process is only accessible from the main RFQ listing (Projects > Requests for Quotation). All other access points to create RFQs will continue to open the legacy RFQ process.
- Currency will default to the Project Base Currency for all RFx events. The functionality to set multiple accepted currencies in the RFx creation step is not available for the RFx at this stage. Other acceptable currencies can be added (for multi-currency projects) in the RFQ view once an RFx event has been sent.
- It is not possible to pull project documents into the new RFx workflow. If you wish to use the project documents, create an RFQ from Projects > Select project > New RFQ option access point or from Procurement Schedule.
- Budget details are not available in the RFx creation process but can be added to the RFQ after it is issued to vendors. Go to RFQ > Quotes > Service Details to update the budget information (if enabled by your organisation).
- RFQ Approval workflows are not available for the RFx workflow. Use the legacy RFQ process to issue RFQs with approval.
- Vendors that have quoted an RFx event can be awarded using the Recommendation for Award (RFA) workflow with approval as per your existing process (if enabled by your organisation).
- The Requested Documents feature is not available for the RFx workflow. Vendors can submit tender returnables in the general attachments section of the RFQ Response.
- Anyone can add, edit or delete quote requirements within any RFQ they have access to. There is no "Apply To" functionality at this stage. When you copy an RFx, it copies the quote requirements and the user can then edit or delete requirements, impacting only that RFQ.
- Only one package can be released at a time using the RFx workflow. If you wish to release multiple packages in a single tender, use the legacy RFQ process.
- Pricing Schedule and Lump Sum pricing requirements are available for all RFx irrespective of your category configuration. It is currently not possible to disable these options.
- Vendor category or location-based recommendations are currently unavailable in the RFx workflow. Use the legacy RFQ process if your organisation requires matched vendors.
- Marketplace vendor recommendations and searches are not currently available in the RFx workflow. Use the legacy RFQ process if you wish to search for vendors from the Felix Vendor Marketplace and invite them to tender on your RFQs.
- RFx workflow respects user permissions that control the ability to add non-approved vendors (vendors in Invited Pending Approval, Declined or Suspended statuses) to an RFQ. Users with permission to invite non-approved vendors will maintain this privilege.
- As this feature is in the testing phase, it is not subject to contracted performance SLAs. However, we have tested key requirements, including but not limited to application security, data integrity, and system integration with other functionality.
- We are continuing to actively work on this functionality and want to hear your feedback. Please sign up for our User Research list here - https://forms.office.com/r/HZeMCxCzFY if you would like to be part of our research community.